Encrypted TrueNAS backup to pCloud
Introduction
TrueNAS conveniently has a built-in rclone client and can therefore establish a connection with many cloud providers relatively easily via the TrueNAS administration interface. It is important that the file or directory names and their contents are stored in encrypted form in the cloud. Nobody knows who has access to the data on a cloud server. Of course, this could also be achieved with an encrypted archive or container, but this unfortunately eliminates incremental transfer and is not an option here.
pCloud is only listed here as an example; the connection of other cloud services (OneDrive, SharePoint, Dropbox, Google Drive, etc.) is also possible. A good overview of the available services can be found here. I found the lifetime offer with 2TB at pCloud fair.
With TrueNAS in particular, this is created really quickly and there is no reason not to create a backup. **No backup, no pity.
The simple 3-2-1 backup rule says that every file exists three times, is stored on at least two different media and once in a different location. A cloud backup is the last option in a 3-2-1 concept.
Destinations
The aim of these instructions is to back up your own files to pCloud, whereby the files are stored on the target in encrypted form.
Disaster recovery is not insignificant: It must also be possible to restore the data by other means if your own TrueNAS server is no longer available. Hard drives break, basements are flooded, hardware is stolen or people make mistakes. If necessary, a laptop with a USB hard drive is all you need to get your encrypted data back.
Last update:
- 24.09.2023: Video for recovery added and details adjusted
- 08.01.2023: [short version](#short version) added
- 07.01.2023: Initial [document](#long version)
Preconditions
- TrueNAS
- Access data for pCloud
- Online](https://my.pcloud.com/) one folder per backup source created as destination, e.g. /HOSTNAME/FOLDERNAME
Short version
Backup with TrueNAS
-
An account for pCloud is stored under
System - Cloud Credentials. -
Hostname:
eapi.pcloud.com. -
Use the LOGIN TO PROVIDER option to log in to pCloud, the rest is then filled in automatically
-
A backup task is now created under
Tasks - Cloud Sync Tasks -
Select the remote credential from above, define the destination and source
-
Select PUSH as the direction and specify a schedule (but leave disabled)
-
The destination is encrypted with Remote and Filename Encryption
-
Use DRY RUN to check whether everything is running smoothly
-
Run the task once manually (this can take hours), then activate the schedule.
Recovery with rclone
-
Set pCloud as provider for rclone
-
Install / download
rclone -
Start configuration with
./rclone configand create new remote (name: pcloud) -
Select pCloud as provider and log in to pCloud, the rest is then filled in automatically
-
However, this only allows plain text access
-
Test with
./rclone lsd pcloud: -
Store encrypted folder in pCloud as provider with rclone
-
Restart configuration with
./rclone configand create new remote (name: pcloud_common) -
For remote, enter the above remote together with the location of the encrypted data (pcloud:HOSTNAME/FOLDERNAME)
-
Store password and salt
-
However, this only allows encrypted access
-
Test with
./rclone lsd pcloud_common:
Long version
Connection of TrueNAS to pCloud
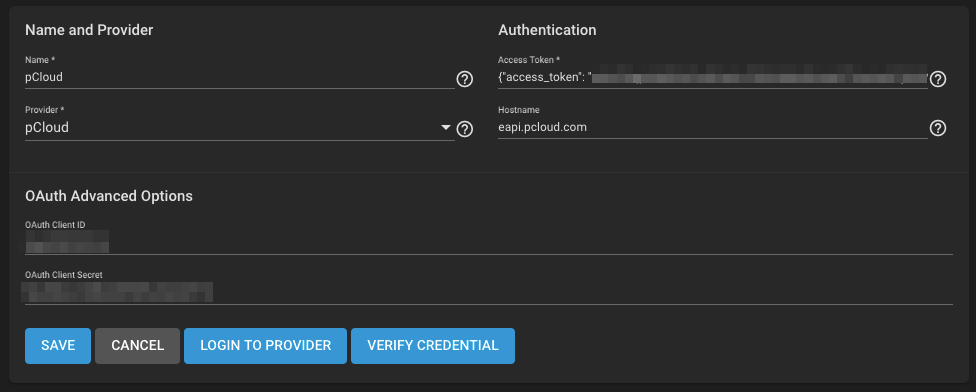
An access is stored under System - Cloud Credentials with ADD.
- Name: pCloud
- Provider: PCLOUD (select from the list)
- Access token: leave empty
- Hostname:
eapi.pcloud.com

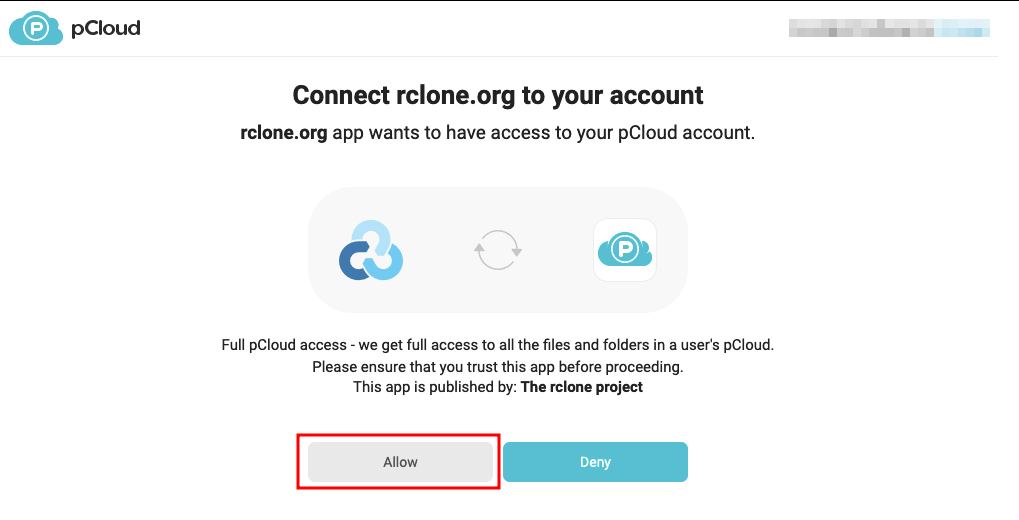
The LOGIN TO PROVIDER option then automatically opens a browser window (https://my.pcloud.com/) in which you can log in to pCloud.

After logging in, access to pCloud must be authorised with ALLOW and the browser window can be closed again.
The three fields ACCESS TOKEN, OAUTH CLIENT ID and OAUTH CLIENT SECRET are then filled in automatically.
Check the login again with VERIFY CREDENTIALS and then save with SUBMIT.
Automatically back up files from TrueNAS to pCloud
A new backup task is now created with ADD under Tasks - Cloud Sync Tasks.
The goal is not just a simple copy of our data, but a complete synchronisation. This synchronisation ensures that all files are not only copied (COPY) but that locally deleted files are also removed at the destination (SYNC).
- Description: pCloud NAME (name for the task)
- Remote Credential: pCloud (PCLOUD) (Select the name assigned above)
- Direction: PUSH
- Transfer Mode: SYNC
The Direction defines the direction. Here FROM TrueNAS TO pCloud should be synchronised.
Do NOT select PULL here, otherwise your local files will be deleted directly the first time, because there is nothing in pCloud yet!
Select a local folder as backup source and a remote folder as backup destination.
- Directory/Files (links):
/PFAD/ORDNERNAME(local path as source) - Folder (right):
/HOSTNAME/ORDNERNAME(remote path as destination) - Schedule: Defines a schedule and below whether the backup task should be active. Tip: Leave deactivated for now.
The following options activate the encryption of the files and the file and folder names.
- Remote Encryption: YES
- Filename Encryption: YES
Of course, any good encryption only works with a good pair of passwords.
- Encryption Password: XXXXXXXXXX
- Encryption Salt: YYYYYYYY
Please do not make up such passwords; better generate and save them WELL!
Shameless self-promotion: In VaultWarden perhaps?
All relevant settings have now been made.
Use DRY RUN to check whether everything is working properly. If so, save with SUBMIT.
The created task is now executed in the overview with RUN NOW. Once it has run successfully (this can sometimes take hours), the schedule can be activated with peace of mind and then run itself. TrueNAS sends/generates an alarm in the event of errors.

I recommend that you create a table for your own documentation:
| Description        | Source              | Destination                  | Schedule    |
|--------------------|---------------------|------------------------------|-------------|
| pCloud gemeinsam   | /PFAD/gemeinsam.    | /HOSTNAME/gemeinsam          | mo-so 6:10  |
| pCloud home        | /PFAD/home          | /HOSTNAME/home               | mo-so 6:20  |
The automatic backup is now set up and continues to run all by itself.
Note: Even if this backup is automated and reports errors, it must not be forgotten. A manual restore should be checked at least once a year, especially after major updates to the TrueNAS system. **Better safe than sorry!
Manually restore files from pCloud to TrueNAS
Files were accidentally deleted and the next sync has not yet been performed?
Then it is very easy to restore the data stored in the cloud: To avoid having to go the long way of the above configuration, TrueNAS has built in a shortcut that can be used to ‘reverse’ a backup task. To do this, there is a RESTORE item under each entry in the backup task overview.

If you click on this, a reduced dialogue appears in which only a name and a target path for the restore are specified.

Once everything has been entered, the dialogue is closed with ‘RESTORE’ and a purely manual task is created (Nothing is copied yet!). All other settings are copied from the original task.
A DRY RUN simulates the task and only a RUN NOW really gets started.
Manually restore files from pCloud to another computer
As a tool, rclone is available on most platforms (Windows, Mac, Linux, FreeBSD, etc.) and is so widespread that it can certainly be considered future-proof. When using it, we have the choice between a console-based or browser-based configuration. On Windows or Mac, make sure that it is executed in the folder in which the archive was unpacked (e.g. C:\User\UserNAME\Downloads\rclone-v1.61.1-win-amd64 or /Users/UserNAME/Downloads/rclone-v1.61.1-osx-amd64).
1. Add pCloud as provider
The first step is to create an account with ./rclone config:
n) New remote
name> pcloud
Storage> pcloud
client_id> leer
client_secret> leer
Edit advanced config? n
Use web browser to automatically authenticate rclone with remote? y
DThis automatically opens a browser window [https://my.pcloud.com/] in which you can log in to pCloud.
After logging in, access to pCloud must be authorised with ‘Allow’ and the browser window closed again.
The ‘Access Token’ is then determined and displayed.

  - type: pcloud
  - hostname: eapi.pcloud.com
  - token: {"access_token":"XXXXXXXXXXXXXXXX","token_type":"bearer","expiry":"0001-01-01T00:00:00Z"}
Keep this "pcloud" remote? y
q) Quit config
2. Add encrypted folders
The logic is: Create a connection (pcloud) and then set the encryption (pcloud_common) of a folder.
- pcloud = the provider that was created in the first step
HOSTNAME/common= a folder that already contains a backup.
So start the configuration again with ./rclone config:
n) New remote
name> pcloud_gemeinsam
Storage> crypt
remote> pcloud:HOSTNAME/gemeinsam
filename_encryption> 1
directory_name_encryption> 1
Password or pass phrase for encryption: y
Enter the password: XXXXXXXXXXX
Password or pass phrase for salt: y
Enter the password: YYYYYYYYYYY
Edit advanced config? n
Keep this "pcloud_gemeinsam" remote? y
q) Quit config
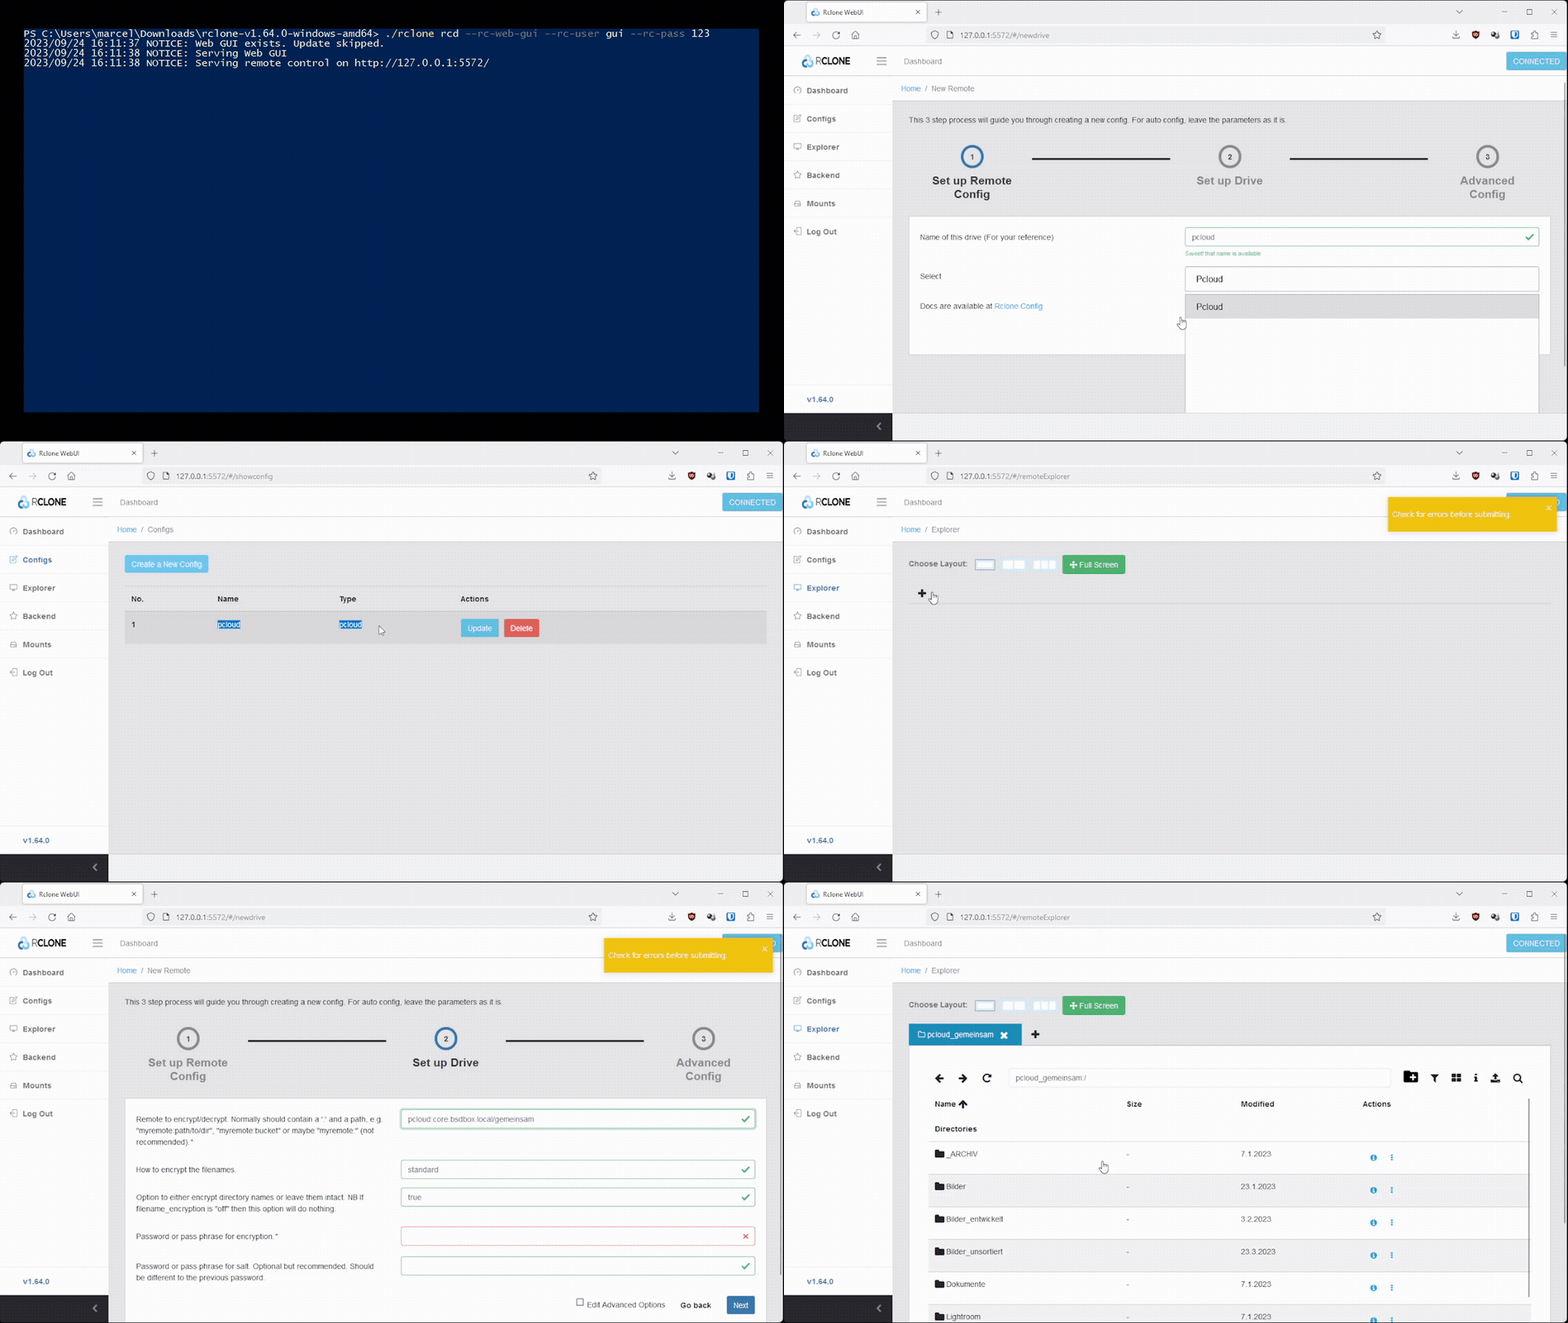
It is also possible to use the web configuration.
If you want to try it out, you can call up the website locally: ./rclone rcd --rc-web-gui --rc-user gui --rc-pass 123.
The procedure is identical to the one listed below, only graphically prepared. A quick run-through:

Commands
- List files: (unencrypted):
./rclone lsd pcloud: - Copy files (unencrypted):
./rclone copy SOURCE DIRECTORY pcloud:DESTINATION DIRECTORY - List files in ‘pcloud_shared’ (encrypted):
./rclone lsd pcloud_common: - Download files from ‘pcloud_common’ (encrypted):
./rclone copy pcloud_common: TARGET DIRECTORY
Here is a list of all commands.
Voilá
